Home Lab Rebuild

It’s been long overdue for some changes to my home lab. The latest full outage on Sept 4, 2017 due to a power brown-out had me realizing that some improvements can be made. There has not been any major changes to the lab since 2015. In 2016 I upgraded the storage in NAS1, memory upgrade for VMH02, added Ubiquiti UAP-AC-LITE access points, and a security camera.

Now I’m going back to the drawing board and doing a fresh rebuild. The goal this time around is to be simple and redundant.

  1. Hardware firewall: I have custom built a 1U Supermicro server that will be used as the new firewall. It has a Intel Xeon X3470 CPU, 8GB RAM, quad gigabit LAN ports and a 200W low power supply. I’ve also replaced the stock passive CPU heat-sink with the Thermaltake Engine 27 low profile heat-sink. It’s a well balanced combination of performance, power and noise. In the old lab design the virtualized firewall introduced too many dependencies and greatly increased the complexity of the network. During a power outage scenario it also requires me to have a VM host and storage online which does not last long on UPS batteries. Having a low power hardware firewall allows me more flexibility and faster recovery from a total lab black-out.
  2. Additional UPS backup power: There will now be a third UPS battery for the home lab. I will dedicate one UPS for the core networking equipment and try to keep the load on it under 25% to maximize the battery life. The rest of the gear will be balanced over the other two UPS batteries.
  3. Standard Virtual Switches: I will be removing the Virtual Distributed Switch and LACP on the ESXi hosts.  This is a tough call but I have weighed the options. The VDS in my environment is overkill. I have two hosts, with only one of them on at a time. In my scenario the VDS’s only purpose is configuration sync. I don’t use traffic shaping, private VLANs, LLDP, etc! The only loss I will take by moving down to a VSS is having to manually maintain the port groups exactly the same on each host and no LACP. That doesn’t concern me because that hardly ever changes.

Continue reading…

Tuning Large Windows DHCP Servers

I’ve been involved in setting up some very large Windows DHCP deployments during my time working as a Consultant at Long View Systems. Along the way I’ve found some interesting challenges and caveats of using Windows DHCP, especially so anytime your working with DHCP enabled dynamic DNS updates. I wanted to have a quick post about this for my own reference and hopefully might come in handy for others as well.

  • DHCP Failover Scopes
  • Administration Overhead
  • DhcpLogFilesMaxSize
  • DynamicDNSQueueLength
  • DnsRegistrationMaxRetries

DHCP Failover Scopes

I’ve covered this topic extensively in my Windows Server 2012 R2 – DHCP High Availability / Fail-over Setup Guide series. Basically, if you are deploying Windows DHCP on a 2012+ server then you should be using DHCP Failover (not to be confused with split-scope or ms-clustering).

Administration Overhead

If you’re working with more than 100 scopes using only the default DHCP MMC-snap in’s, you’re gonna have a bad time.

Almost 1,000 DHCP scopes, 150k+ IP addresses

Performing administration tasks in the console with a large number of scopes becomes very repetitive and time consuming as each task normally requires many clicks. Making mass-changes is also very difficult or next to impossible. You may find yourself becoming familiar with Powershell scripting to resolve this problem. The DHCP Server Cmdlets in Windows PowerShell are very easy to use and Microsoft has great documentation on this. I found myself making Powershell scripts to make mass-changes much easier and less vulnerable to human error due to the very repetitive nature of the default GUI. Continue reading…

Windows Server 2012 R2 – DHCP High Availability / Fail-over Setup Guide (Part 2)

windows_server_2012

Part 2 – Setup of Windows 2012 R2 DHCP Failover

Click here to go to Part 1

This build will required 2 x Windows 2012 R2 servers. They both must have the DHCP role installed in preparation for the DHCP fail over configuration. I will not cover the installation of the the OS in this guide.

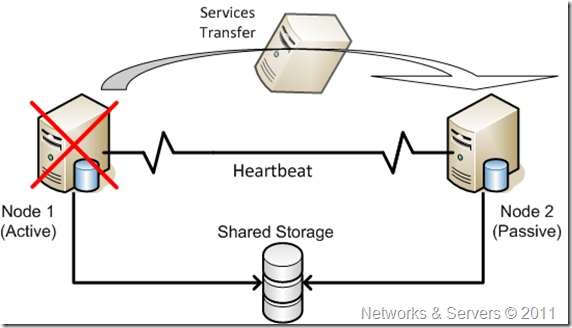
In this guide I simply used two VMware virtual machines in my home lab to accomplish this. The two servers I used are actually my domain controllers as well. In a production environment it would be best to have this as a dedicated role on the servers, depending on the size & requirements of the environment. We will be building a DHCP Hot-Standby cluster.

1 – Server Preparation

  1. Build your two required Win. 2012 R2 servers.  Your servers should configured with an IP address, DNS, domain, etc and should be fully functioning on your network.
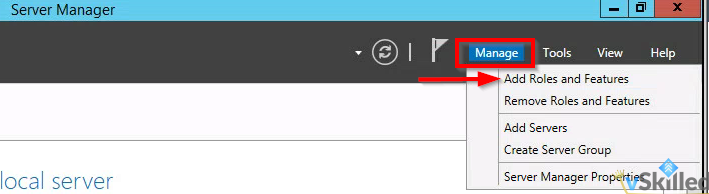
  2. Ensure that the DHCP role is installed on both servers. From the Server Manager select the Manage button, and click Add Roles and Features.
    000145_2015-07-06 13_40
  3. Select “Role-based or feature-based installation“. Click Next.
  4. Select your server from the list in the pool. It should reflect your FQDN and IP appropriately, ensure this is correct. Click Next.
  5. From the Roles list, select “DHCP Server“. Another prompt will appear to install the management tools. Click Add Features, then click Next.
  6. Skip to the end of the installer and click Install. The DHCP role will be installed. Repeat this process on the 2nd server.
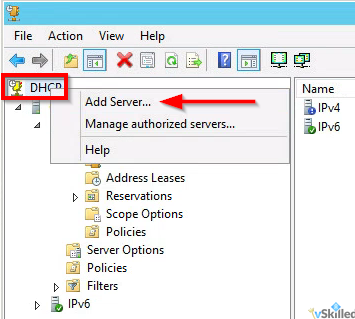
  7. Open the DHCP management utility from the Administrative Tools folder on your primary server. This gives us a view of the DHCP installation on the local server. From the DHCP root menu, right click and select “Add Server” as shown.
    000146_2015-07-06 13_54
  8. Enter the FQDN or IP of your 2nd Win. 2012R2 server and click OK. This will add the second server into the view so that we can manage both servers from here.

2 – Scope Setup

Before we can setup DHCP failover we need at least one DHCP scope configured. This scope should ONLY be configured on the primary DHCP server and MUST NOT be added to the secondary DHCP server.

  1. On your primary server only – Right click on the IPv4 object. Click “New Scope…”. This will add a new IPv4 scope.
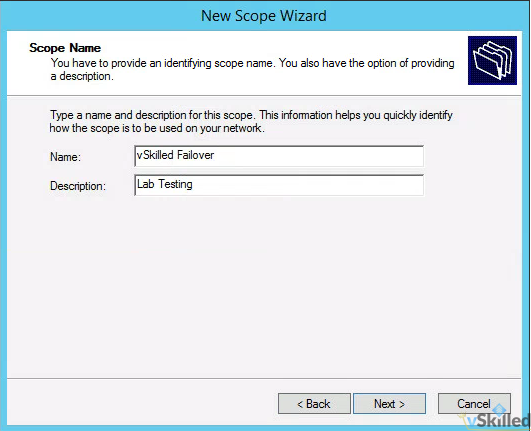
  2. Enter the Name and Description of your DHCP scope. Click Next.
    000147_2015-07-06 14_01
  3. Enter the IP range of the scope as well as the subnet length and mask. The mask should be generated for you based on the length you enter. A /24 would include 254 usable IP’s which is more than sufficient for this test.
    000148_2015-07-06 14_08
  4. You will be promoted for any exclusions or delays. Add if required. Otherwise click next.
  5. Enter the lease duration for the scope. I will leave this at the default of 8 days. Click Next.
  6. Select “Yes, I want to configure these options now“. This will allow us to configure the gateway, DNS servers appropriately so that clients who get an IP address can communicate properly on our network.
  7. On the Router / default gateway page enter the IP address of your router or aggregate switch here. Click Add, then Next.
  8. On the DNS Name and DNS servers page enter the domain of your environment and the DNS servers that you want clients to use. Click Next.
  9. Add a WINS server if you have or need one. (Probably not.) Click Next.
  10. Finally you will be asked to activate the scope now. Select “No, I will activate the scope later“, or you can enable it if you wish. Click Next, then click Finish.

3 – Failover Cluster Configuration / Setup

Now we will configure the DHCP failover cluster on the DHCP scope(s).

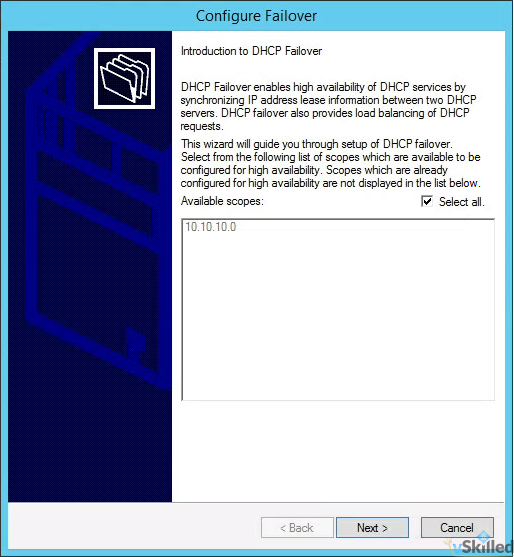
  1. Right click on the root IPv4 menu and click “Configure Failover…”.
  2. By default “Select all” is selected. If that is okay, you can leave that selected. Otherwise you can manually select the IPv4 scope(s) that you want to have failover enabled on. Click Next.
    000149_2015-07-06 14_22
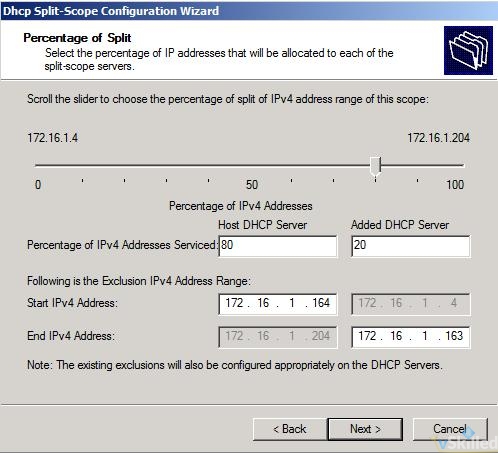
  3. Enter the FQDN or IP of the secondary DHCP server and click Add Server. Click Next.
  4.  Configure the Failover Relationship options. (Please see below for an explanation of these options!)
    • Relationship Name: <enter a name for your DHCP failover relationship>
    • Max Client Lead Time: 1 hour (default)
    • Mode: Hot-Standby
    • Reserve Addresses %: 5% (default)
    • State Switchover Interval: Checked, 1 hour
    • Enable Message Authentication: Yes
    • Shared Secret: <configure a secure password>
      000150_2015-07-06 14_43
  5. Once you have configured the options to your liking, click Next. A summary screen will appear. Click Finish to create the failover relationship.
    000151_2015-07-06 14_48
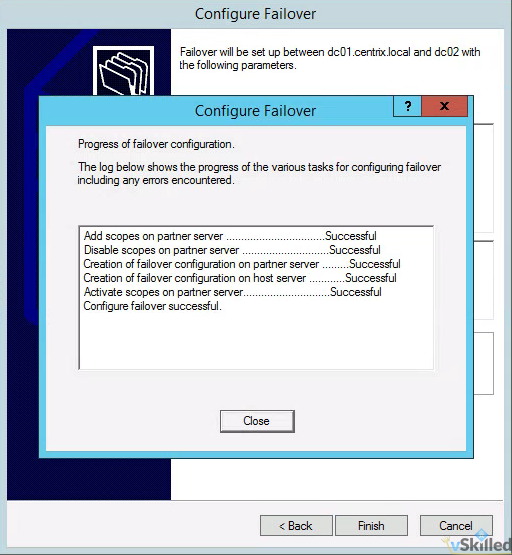
  6. You will get a screen that shows the status of the replication of your scope to the partner/secondary server. Ensure everything shows as “successful” and close the window.
  7. We have now successfully setup a Windows 2012 R2 DHCP  hot-standby fail-over cluster!

Going Deep – Explanation of Windows 2012 DHCP fail-over configuration options

In summary, the State Switchover Interval needs to be configured so that the servers will automatically failover to the standby server without manual administrator intervention. We must also configure the MCTL value so that the partner server can issue temporary leases addresses until the standby server takes full control of the scopes which happens after the State Switchover Time expires and the partner transitions to Partner Down state.

Both DHCP servers in a failover relationship must maintain a persistent TCP connection with each other. DHCP failover partners establish and maintain this connection on port 647, and use it to exchange operational state information and lease information.

State Switchover Interval: If automatic state transition is enabled, a DHCP server in communication interrupted state will automatically transition to partner down state after a defined period of time. This period of time is defined by the state switchover interval. A server that loses communication with a partner server transitions into a communication interrupted state. The loss of communication may be due to a network outage or the partner server may have gone offline. By default, since there is no way for the server to detect the reason for loss of communication with its partner, the server will continue to remain in communication interrupted state until the administrator manually changes the state to partner down. However, if you enable automatic state transition, DHCP failover will automatically transition to partner down state when the auto state switchover interval expires. The default value for auto state switchover interval is 60 minutes. If enabled, automatic state transition will occur from the COMMUNICATIONS INTERRUPTED state to PARTNER DOWN state when the state switchover interval expires.

Reserve Percentage: In a failover relationship configured in hot standby mode, administrators can specify a percentage of the address range of the scope as reserved for the hot standby server. A number of addresses, in proportion to the percentage value configured, are assigned to the hot standby server. The hot standby server will use these addresses to service new clients after the primary server goes down, during the time interval before the standby server assumes control over the entire IP address range of a scope. The hot standby server assumes control over the entire IP address range only after it transitions into partner down state and a certain time (defined by MCLT) has elapsed after moving into the partner down state. If an administrator sets this parameter to zero, no addresses are reserved for the hot standby server, and the failover partner server cannot grant new client leases until the time that the hot standby assumes control over the entire IP address range. The default value for reserve address percentage is 5%.

Maximum Client Lead Time (MCTL): The maximum amount of time that one server can extend a lease for a DHCP client beyond the time known by the partner server. The MCLT defines the temporary lease period given by a failover partner server, and also determines the amount of time that a server in a failover relationship will wait in partner down state before assuming control over the entire IP address range. The MCLT cannot be set to zero, and the default setting is 1 hour.


Windows Server 2012 R2 – DHCP High Availability / Fail-over Setup Guide (Part 1)

windows_server_2012

Part 1 – Background on Windows DHCP

Click here to go to Part 2

Why move to Windows 2012 R2 for DHCP? (from 2008 R2)

First we must understand how DHCP works in Windows Server 2008 R2. DHCP met high availability requirements by hosting the DHCP service on a Windows Failover Cluster or using split scope deployments. These mechanisms both have their disadvantages.

The split scope mechanism relies on configuring identical scopes on two DHCP servers and setting up the exclusion ranges in such a fashion that 80% of a subnet’s IP range is used for leasing out IP addresses by one of the servers (primary) and remaining 20% by the other server (secondary). The secondary server is often configured to respond to clients with a slightly delayed response so that clients use IP addresses from the primary server whenever it is available. Split scope deployments suffer from two problems. IPv4 subnets often run at utilization rates above 80%. In such subnets, split scope deployment is not effective given the low free pool of IP addresses available. The other issue with split scope is the lack of IP address continuity for clients in case of an outage of the primary server. Since the IP address given out by the primary DHCP server would be in the exclusion range of the secondary server, the client will not be able to renew the lease on the current IP address and will need to obtain a new IP address lease from the secondary server. In the case of split scope, the two DHCP servers are oblivious to each others presence and do not synchronize the IP address lease information.

dhcpsplitscope

When using Windows Failover Cluster, the DHCP database needs to be hosted on a shared storage accessible to both nodes of a cluster in addition to the deployment of the cluster itself. DHCP servers running on each node of the cluster operate on the same DHCP database hosted on the shared storage. In order to avoid the shared storage being the single point of failure, a storage redundancy solution needs to be deployed. In a virtual environment this is even more complicated. This increases the complexity as well as the TCO of the DHCP high availability deployment. Yuck..

windowsfailoverclustering


Windows Server 2012 R2 brings real fail over to the table!

The Windows Server 2012 DHCP fail over mechanism eliminates these shortcomings and provides a vastly simplified deployment experience. Moreover, DHCP fail-over is supported in all editions (Foundation, Standard, Data Center) of Windows Server 2012.

  • DHCP failover can be configured, and settings can be modified without the need to pause, stop, or restart the DHCP Server service.
  • Replication of scope settings can be initiated from either DHCP server to its failover partner server.
  • DHCP servers configured as failover partners can be located on different subnets, but this is not required.
  • When DHCP failover is enabled on a DHCP scope, the DHCP server that renews a DHCP client lease can be different from the DHCP server that initially granted the lease.
  • Two DHCP servers configured as failover partners will attempt to maintain a persistent TCP/IP connection.
  • Two separate, synchronized client lease databases are maintained independently by each DHCP failover partner server.
  • DHCP servers configured as failover partners are both aware of the status of the DHCP service on the other server, and are informed of any change in that status with minimal delay.
  • If two DHCP servers configured as failover partners are unable to communicate, precautions are taken to avoid the same IP address lease being issued to two different DHCP clients.
  • If a DHCP server becomes unavailable before it is able to successfully synchronize all DHCP client information with its failover partner, precautions are taken to ensure DHCP lease continuity for DHCP clients.

imarealboy

Windows Server 2012 DHCP provides a new high availability mechanism addressing these critical aspects. Two DHCP servers can be set up to provide a highly available DHCP service by entering into a fail-over relationship. A fail-over relationship has a couple of parameters which govern the behavior of the DHCP servers as they orchestrate the fail-over. One of them is the mode of the fail-over operation – I will describe this shortly. The other is the set of scopes that are part of the fail-over relation. These scopes are set up identically between the two servers when fail-over is configured. Once set up in this fashion, the DHCP servers replicate the IP address leases and associated client information between them and thereby have up-to-date information of all the clients on the network. So even when one of the servers goes down – either in a planned or in an unplanned manner – the other DHCP server has the required IP address lease data to continue serving the clients.

Gotcha’s

  • You cannot configure DHCP failover on a DHCP scope to include more than two DHCP servers.
  • DHCP failover supports DHCPv4 scopes only. DHCPv6 scopes cannot be failover-enabled.
  • If parameters of a failover-enabled scope are modified, these settings must be manually replicated to the partner DHCP server. Note: Automatic replication of scope settings is available if you use IP address management (IPAM) in Windows Server 2012 R2 to modify failover-enabled scope settings.
  • DHCP clients must be able to communicate with both DHCP failover partner servers, either directly or using a DHCP relay.


Click here to go to Part 2