I am sure that most who have a lab environment in their home also have a way of remotely accessing it – either from at work, with friends or family, vacation, etc. The problem with any remote access into a secure network is that you are quite literally punching a hole into your network from a security sense to allow that to happen.
People seem to have a lot of mixed feelings about allowing Remote Desktop Protocol (RDP) into their home network from the Internet. As a general blanket statement without context, I would completely agree. Opening RDP (port 3389) directly to the Internet without any other security measures in place is asking for trouble. The default RDP port will be constantly brute forced, port scanned, exploited, and the list goes on.
With that said there are steps you can take to have secure remote access to your home network using RDP, SSH, etc.
Many of these concerns can be minimized or eliminated using some of these best practices:
- Restrict access using firewalls
- Change the listening port for Remote Desktop Protocol
- Use two-factor authentication
- Use strong passwords
- Set an account lockout policy
1 – Restrict access using firewalls
Having a proper firewall and firewall rules in place is critical for protecting your network from outside threats. And I’m not talking about the built-in firewall on your ISP’s provided/rented crappy router/modem – these are a very poor excuse and implementation of a “firewall”- not to mention your ISP normally hard codes back-doors and default logins. I’m talking about a real firewall either physical or virtual, for example; Cisco ASA, Cisco Meraki, Untangle, PF Sense, Sophos UTM/XG, Ubiquiti, etc. Any of these will give you the tools required to properly firewall your home network. All of these firewalls will require a ‘geek’ to properly setup – keep in mind this article is targeted to home lab hobbyists.
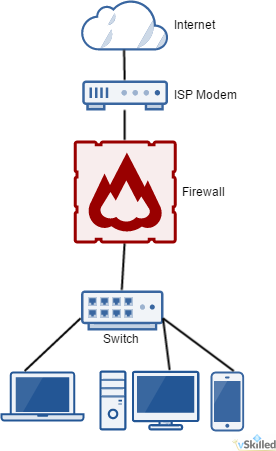 To the right is a good example of a very basic home network with a firewall. Anything before the firewall we treat as untrusted. The firewall is literally the barrier between your network and the big, bad, Internet. There you will define your firewall rules to allow remote access and other functionality (or lack-thereof).
Personally, I use Sophos UTM (see my homelab) with a DNAT (Destination Network Address Translation) rule to redirect the external facing remote access port to a specific server and port on my internal network. This allows me to create a matching condition (For traffic from, Using service/port, Going to) to apply an action (Change the destination to, And the service to) to define what happens when something wants to connect to my network. Using that logic I can (and do) restrict the IP blocks allowed to connect to my remote access port, what times of day, etc.
This allows me to both A; define a custom externally facing port without having to change the port on the server internally, and B; create firewall rules to restrict access even further from specific traffic sources, destinations and services.
The real-world implementation of this will vary based on your choice of firewall, your skills and personal preferences.
2 – Change the listening port for Remote Desktop Protocol
Changing the listening port of RDP is a quick and easy method of implementing security through obscurity. Doing so will help to hide your RDP port from threats who scan networks looking for computers listening on the default Remote Desktop port (TCP 3389).
There are a number of ways to accomplish this. 1 – port redirection on your firewall/router, 2 – modifying the registry keys of the Windows computer locally, or 3 – using a Windows TS Gateway. Choose the method that works best for you.
3 – Use two-factor authentication
Using 2FA (two-factor authentication) is a no brainier these days. Two-factor authentication provides a second layer of security to any type of login, requiring extra information or a physical device to log in, in addition to your password. This protects user logins from remote attacks that may exploit stolen credentials.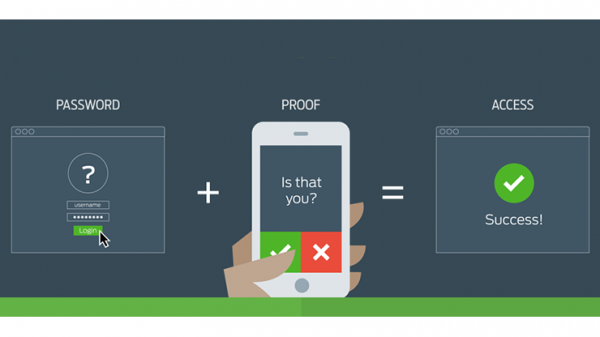
I use Duo Security Personal edition on my remote RDP access to my home environment. I have configured Duo to only prompt 2FA if the source IP is external. That way I don’t need to use 2FA for local RDP sessions from within my LAN – which would just be annoying. Any time I want to login I just connect, enter my credentials, answer the 2FA prompt on my phone, and I’m in. The Duo Dashboard also has a wide range options, logging, and device fingerprinting. Duo works on a huge number of operating systems and platforms so you can integrate it into, almost, literally any part of your network as you deem fit.
If you are not already using 2FA in your network, start using it! It’s free and extremely easy to setup.
4 – Use strong passwords
While this one may seem like common sense, you would be surprised. A strong password should be at least 8 characters long using a combination of upper and lower case characters – including a mix of both numbers and symbols. Setting an insecure password on anything, let alone a remote entry point to your network could spell disaster.
One of the best ways to ensure that you use unique and strong passwords for systems and websites is to use a password manager. I personally use and recommend Dashlane.
5 – Set an account lockout policy
Brute force attacks are common problem for external facing ports and services. Remember that two-factor authentication only comes into effect once the password is correctly entered and will not prevent a brute force attack. Setting your computer to lock an account for a period of time after a number of incorrect guesses will help prevent attackers from using automated password guessing tools to break into your account.
- Go to Start–> Programs –>Administrative Tools–> Local Security Policy
- Under Account Policies –>Account Lockout Policies, set values for all three options.
- 3 invalid attempts with 3 minute lockout durations are reasonable choices.
Conclusion
Hopefully these tips can help you to increase the security of your home network and remote access methods. If you know what you are doing and if done correctly you can have secure remote entry into your home network. This is not meant to be a be-all-end-all guide as there is no one size fits all for network security. This guide doesn’t even begin to dive into the more complex aspects of network security such as advanced threat protection, intrusion prevention, spoof & protocol protection, and so on.
Have more home lab security tips to share? Post them in the comments below!



 To the right is a good example of a very basic home network with a firewall. Anything before the firewall we treat as untrusted. The firewall is literally the barrier between your network and the big, bad, Internet. There you will define your firewall rules to allow remote access and other functionality (or lack-thereof).