Windows Server 2012 R2 – DHCP High Availability / Fail-over Setup Guide (Part 2)
Part 2 – Setup of Windows 2012 R2 DHCP Failover
This build will required 2 x Windows 2012 R2 servers. They both must have the DHCP role installed in preparation for the DHCP fail over configuration. I will not cover the installation of the the OS in this guide.
In this guide I simply used two VMware virtual machines in my home lab to accomplish this. The two servers I used are actually my domain controllers as well. In a production environment it would be best to have this as a dedicated role on the servers, depending on the size & requirements of the environment. We will be building a DHCP Hot-Standby cluster.
1 – Server Preparation
- Build your two required Win. 2012 R2 servers. Your servers should configured with an IP address, DNS, domain, etc and should be fully functioning on your network.
- Ensure that the DHCP role is installed on both servers. From the Server Manager select the Manage button, and click Add Roles and Features.

- Select “Role-based or feature-based installation“. Click Next.
- Select your server from the list in the pool. It should reflect your FQDN and IP appropriately, ensure this is correct. Click Next.
- From the Roles list, select “DHCP Server“. Another prompt will appear to install the management tools. Click Add Features, then click Next.
- Skip to the end of the installer and click Install. The DHCP role will be installed. Repeat this process on the 2nd server.
- Open the DHCP management utility from the Administrative Tools folder on your primary server. This gives us a view of the DHCP installation on the local server. From the DHCP root menu, right click and select “Add Server” as shown.
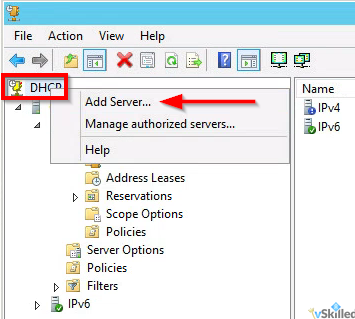
- Enter the FQDN or IP of your 2nd Win. 2012R2 server and click OK. This will add the second server into the view so that we can manage both servers from here.
2 – Scope Setup
Before we can setup DHCP failover we need at least one DHCP scope configured. This scope should ONLY be configured on the primary DHCP server and MUST NOT be added to the secondary DHCP server.
- On your primary server only – Right click on the IPv4 object. Click “New Scope…”. This will add a new IPv4 scope.
- Enter the Name and Description of your DHCP scope. Click Next.
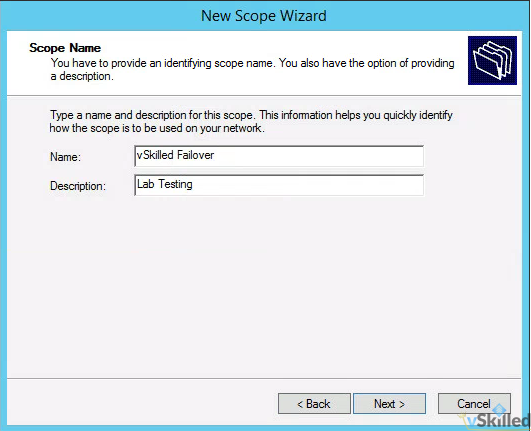
- Enter the IP range of the scope as well as the subnet length and mask. The mask should be generated for you based on the length you enter. A /24 would include 254 usable IP’s which is more than sufficient for this test.
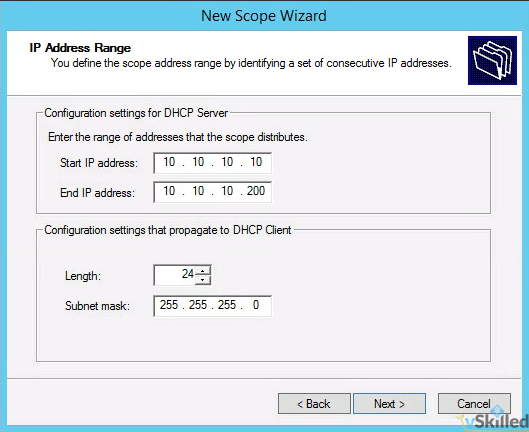
- You will be promoted for any exclusions or delays. Add if required. Otherwise click next.
- Enter the lease duration for the scope. I will leave this at the default of 8 days. Click Next.
- Select “Yes, I want to configure these options now“. This will allow us to configure the gateway, DNS servers appropriately so that clients who get an IP address can communicate properly on our network.
- On the Router / default gateway page enter the IP address of your router or aggregate switch here. Click Add, then Next.
- On the DNS Name and DNS servers page enter the domain of your environment and the DNS servers that you want clients to use. Click Next.
- Add a WINS server if you have or need one. (Probably not.) Click Next.
- Finally you will be asked to activate the scope now. Select “No, I will activate the scope later“, or you can enable it if you wish. Click Next, then click Finish.
3 – Failover Cluster Configuration / Setup
Now we will configure the DHCP failover cluster on the DHCP scope(s).
- Right click on the root IPv4 menu and click “Configure Failover…”.
- By default “Select all” is selected. If that is okay, you can leave that selected. Otherwise you can manually select the IPv4 scope(s) that you want to have failover enabled on. Click Next.
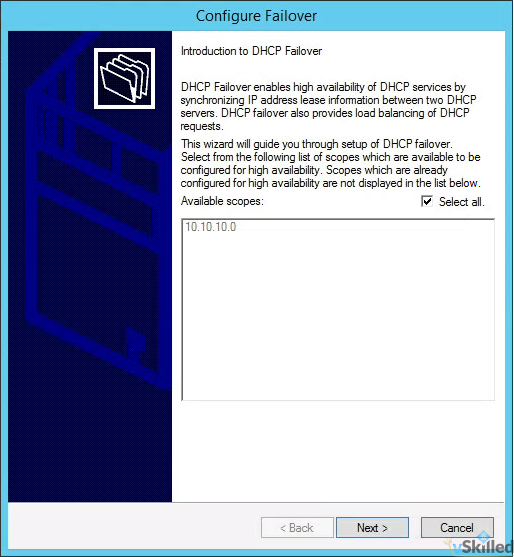
- Enter the FQDN or IP of the secondary DHCP server and click Add Server. Click Next.
- Configure the Failover Relationship options. (Please see below for an explanation of these options!)
- Relationship Name: <enter a name for your DHCP failover relationship>
- Max Client Lead Time: 1 hour (default)
- Mode: Hot-Standby
- Reserve Addresses %: 5% (default)
- State Switchover Interval: Checked, 1 hour
- Enable Message Authentication: Yes
- Shared Secret: <configure a secure password>
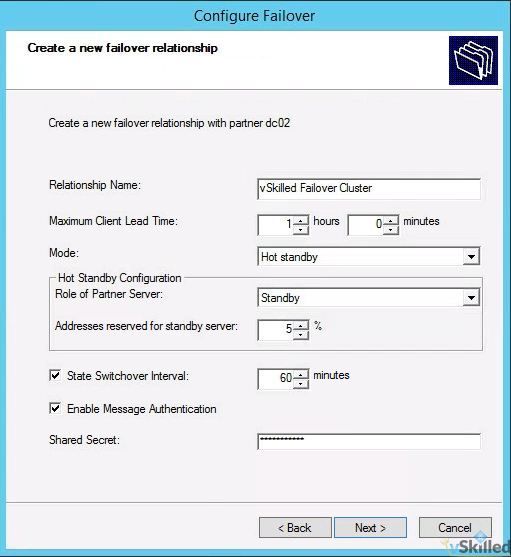
- Once you have configured the options to your liking, click Next. A summary screen will appear. Click Finish to create the failover relationship.
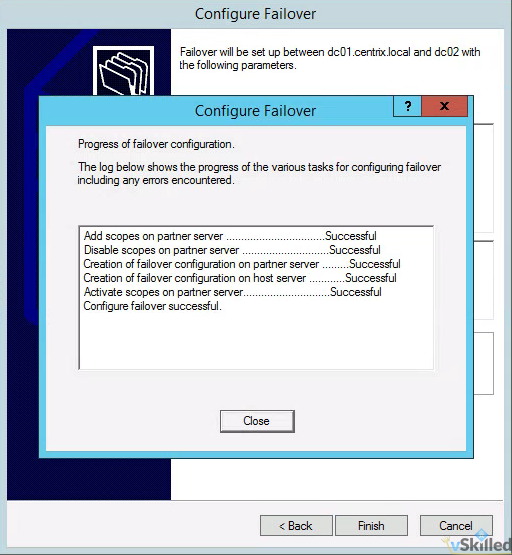
- You will get a screen that shows the status of the replication of your scope to the partner/secondary server. Ensure everything shows as “successful” and close the window.
- We have now successfully setup a Windows 2012 R2 DHCP hot-standby fail-over cluster!
Going Deep – Explanation of Windows 2012 DHCP fail-over configuration options
In summary, the State Switchover Interval needs to be configured so that the servers will automatically failover to the standby server without manual administrator intervention. We must also configure the MCTL value so that the partner server can issue temporary leases addresses until the standby server takes full control of the scopes which happens after the State Switchover Time expires and the partner transitions to Partner Down state.
Both DHCP servers in a failover relationship must maintain a persistent TCP connection with each other. DHCP failover partners establish and maintain this connection on port 647, and use it to exchange operational state information and lease information.
State Switchover Interval: If automatic state transition is enabled, a DHCP server in communication interrupted state will automatically transition to partner down state after a defined period of time. This period of time is defined by the state switchover interval. A server that loses communication with a partner server transitions into a communication interrupted state. The loss of communication may be due to a network outage or the partner server may have gone offline. By default, since there is no way for the server to detect the reason for loss of communication with its partner, the server will continue to remain in communication interrupted state until the administrator manually changes the state to partner down. However, if you enable automatic state transition, DHCP failover will automatically transition to partner down state when the auto state switchover interval expires. The default value for auto state switchover interval is 60 minutes. If enabled, automatic state transition will occur from the COMMUNICATIONS INTERRUPTED state to PARTNER DOWN state when the state switchover interval expires.
Reserve Percentage: In a failover relationship configured in hot standby mode, administrators can specify a percentage of the address range of the scope as reserved for the hot standby server. A number of addresses, in proportion to the percentage value configured, are assigned to the hot standby server. The hot standby server will use these addresses to service new clients after the primary server goes down, during the time interval before the standby server assumes control over the entire IP address range of a scope. The hot standby server assumes control over the entire IP address range only after it transitions into partner down state and a certain time (defined by MCLT) has elapsed after moving into the partner down state. If an administrator sets this parameter to zero, no addresses are reserved for the hot standby server, and the failover partner server cannot grant new client leases until the time that the hot standby assumes control over the entire IP address range. The default value for reserve address percentage is 5%.
Maximum Client Lead Time (MCTL): The maximum amount of time that one server can extend a lease for a DHCP client beyond the time known by the partner server. The MCLT defines the temporary lease period given by a failover partner server, and also determines the amount of time that a server in a failover relationship will wait in partner down state before assuming control over the entire IP address range. The MCLT cannot be set to zero, and the default setting is 1 hour.


Pingback: Windows Server 2012 R2 – DHCP High Availability / Fail-over Setup Guide (Part 1) « vSkilled.com